The death of my American Hovabator incubator
Updated on 12 Dec 2015 When my American Hovabator incubator died, it put me into a bit of a spin because I essentially wasted about 60 quail eggs due to the thermostat packing it in. Basically, the temperature soared overnight to past 120 F and the developing embryos wouldn’t have stood a chance.
I fiddled and did my best to fix my Hovabator, unfortunately, I just couldn’t get the manual wafer thermostat to operate reliably so I decided to investigate getting a new incubator. I could have tried to install a new thermostat but that meant sourcing the part (probably from the USA) and to be honest I’d had enough of manually setting the Hovabator’s screw adjust thermostat anyway, and I wanted an incubator which had a digital thermostat instead.
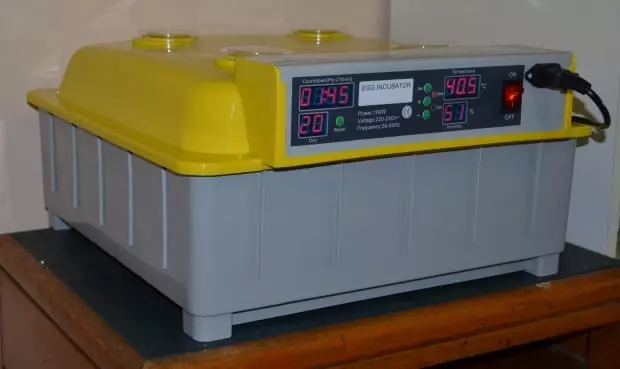
My new "no name" Chinese made egg incubator (image above)
Hovabator, made by an American company (GQF), does have a new model with a digital thermostat and I thought about purchasing the unit; however, over the past few years I noticed a surge in “no name” Chinese made incubators coming onto the market and I decided to investigate if buying one of them would be more cost effective and possibly even a better unit.
The Hovabator series of incubators are good and apart from mine dying, it has been a reliable incubator for us over many years. Nevertheless, Hovabator incubators are expensive, and although they are stocked by some suppliers here in Australia, Hovabator incubators are not always easy to procure. Also, besides the unit, there are the accessories to buy – primarily the automatic egg turner, which fits inside the incubator to hold and turn the eggs saving valuable time and effort. These egg turners alone can be up to $200, and for a plastic egg holder with a tiny motor just to oscillate the eggs back and forth, that’s expensive!
Leap of faith – purchased a “no brand” incubator
Therefore, as good as Hovabator’s reputation is, I couldn’t help but wonder if a cheap $138 Chinese incubator, no brand, with digital thermostat and automatic egg turner, and postage included, was the better option for me. At the end of the day, I’m not a commercial producer and I really only use my incubator a few times a year to keep our poultry stocks at an appropriate level for our own use.
Well, I did as much research online as I could to find out about Chinese made incubators (designed primarily for the backyard poultry enthusiast) but I couldn’t find a great deal of information about them or reviews (like this one I’m doing now). Regardless, I eventually came to the conclusion that I would take a chance and buy one to find out for myself what they were really like.
I figured, if the incubator turned out to be rubbish I could always return it anyway, or, just use it as a backup/overflow incubator to a more expensive brand name incubator I would naturally have to subsequently purchase. So I purchased a 48 egg incubator from eBay.
Chinese no brand incubator worked great (with some tweaks)
Thankfully, after trialling my cheap Chinese incubator and successfully hatching out my latest batch of quail with some chickens at the same time, I can say my “no brand” incubator has impressed me! Still, I had to work out a few things for myself as the included manual wasn’t the best, also, I needed to make some minor adjustments to the default settings to ensure I had the temperature operating at the correct level. After I had ironed out those details and got used to the operation of my new incubator, I’ve been really happy with how it performs overall.
The proof is in the pudding and obviously if I’m hatching out chicks with a good success rate then the incubator must be doing an alright job in my opinion. Purists will say nothing beats a good, reliable brand and that’s certainly true sometimes; just the same, one shouldn’t blindly discount the competition either because only fools, patriots, and people with too much money pay more than they ought.
Edit: TIP: One other thing I need to stress – you really should use extra insulation to cover this incubator when in operation or enclose it in a box to help prevent the motor working too hard and failing. I encourage you to read this review in full if you are considering buying this incubator.
Several varieties of similar no brand incubator on the market
There are several varieties (differing slightly in make and size) of this particular Chinese made incubator on the market and they all look very similar. The common model and the one I purchased holds 48 large poultry eggs but there are smaller and larger options. Some earlier varieties don’t come with an automatic egg turner and so are cheaper; although, I would urge people who are buying their first incubator to get one with an automatic egg turner simply because turning the eggs manually by hand is a real pain.

48 automatic egg turner for the "no name" incubator (image above)
So, how does the 48 egg model I purchased work with small quail eggs? Good question. My backup plan was to insert my quail egg turner, which I used for my Hovabator into my new incubator – this would have required some physical modification to the new unit. However, the retailer told me some of her customers had used the larger egg turner moulds for the small quail eggs without a problem. And, as I found out for myself, this is true. It seems the one-size-fits-all auto egg turner actually works a treat and oscillates the small quail eggs perfectly.
As for chicken eggs, the same egg turner mould did a great job with them too and in the end my hatch rate for quail was close to 100% and the chickens was about 80%. Of course, hatch rate can be influenced by many things but what I'm sure about is my hatch rate was no worse than my old Hovabator incubator. In fact, coincidence it may be, but this last batch of incubated eggs in my new Chinese incubator happened to be the best hatch rate I can recall for awhile.

The image above shows quail chicks just hatched beside chicken eggs. The chickens hatched a few days later. It's not recommended to incubate different poultry eggs together due to different hatching times etc but with some extra management it can be done successfully.
Operation
I said I needed to make some adjustments – let’s get to that soon. Firstly, the unit is quite large 50cm x 53cm x 29cm and it has the following features:
-
Fully Automatic
-
Automatic Egg Turner and Emergency Alert
-
Humidity Alarm
-
Temperature Alarm
-
Digital Day Count (to know how long the eggs have to go)
-
4 x Viewing Windows – (although you can't see much through them).
-
LED Display for Temperature, Humidity and Day Counter
-
240 power
-
Compatible power Plug
-
PVC Construction
-
Water channels for Humidity Management (place some water in the bottom of the incubator to raise the humidity if required)
As you can see, you get quite a bit of technology with this unit. I mean, my top brand Hovabator had no warning alarms, digital countdowns, or digital thermostat and it was 3 times the price!
Simple operation – Incubators aren't rocket science but to hatch eggs successfully with this unit (and most units really) a few points to note are:
-
The manual – Unsurprisingly, the manual (converted to English from Chinese) isn't the best reading. However, it was good enough for me to see what the acronyms on the display meant when making adjustments (like temp etc). I found remembering these acronyms difficult and scrolling through the display menu confusing so I stuck the acronym along with each meaning on top of the unit for easy reference.
-
Dry run – Before actually using the incubator with real eggs, set the unit up and run it for a few days monitoring the temperature and humidity readings. This will allow you to get used to operating the unit and iron out any “funnies” before you start with real eggs.
-
Temperature – I used a digital lab thermometer (accurate to about ½ degree) and found my unit ran cooler than the reading on the display. Therefore, I adjusted the incubators temp up accordingly until my independent measurement was at 37.8 Celsius (100F). You can also set alarms to warn if the temp falls too low or goes too high and this is useful because temps can fluctuate due to developing chicks (generating heat) or atmospheric conditions. If so, an alarm sounds and the settings can be adjusted up or down.
-
Humidity – If the incubator is too dry (low humidity) the eggs can dry out and it can also make the egg shells harder to peck through for the chicks when hatching. What humidity is best for hatching? This can be worked out by egg weight, air sack percentage and all that; but personally, I like to keep the humidity levels in my incubator no lower than 25% and no higher than 75% – somewhere around the middle is good. The display in this incubator shows the humidity reading and also has a low humidity alarm (which can be adjusted to suit) as a reminder when some water needs to be added to bring humidity levels back up.
-
Egg turner – In a natural environment the hen turns her eggs in the nest constantly throughout the day so with an incubator this needs to be done either manually or with an automatic egg turner. Turning eggs manually 3 times per day is not only a pain but it's not good for trying to keep a constant temp in the incubator due to the constant opening of the lid. This unit comes with an automatic egg turner powered by plugging it in internally to the display. Two days prior to the scheduled hatching date the eggs are not required to be turned because the chicks will be starting to prepare for hatching. The turner should be removed and the eggs placed on the mesh floor ready for the hatching process.
-
Location – The unit is quite effective in regulating and maintaining a constant temp; nevertheless, the incubator is only made from plastic with limited insulation so it is susceptible to wind buffering and quick temp changes. It's recommended for all incubators to be kept in a room which has a reasonably constant temp and no breezes or direct sunlight.
-
Power – The power outlet is at the front, which is kind of weird and annoying but I guess that's hardly a deal breaker for buying the incubator. Still, most appliances have the power outlet on the rear of the unit so the cord is out of the way and I do find the power cord in this instance does occasionally get in the way when lifting the lid. If the power is accidentally turned off, an inner power supply keeps the settings and readings – this is a pretty clever electronic device considering how cheap it was to buy.

Acronyms on display are confusing so I stuck the meanings on top of unit for easy reference (image above)
Other points about the incubator
The flooring – I'm not a fan of the plastic mesh floor on this particular incubator as it tends to bow in places; more importantly however, the plastic mesh floor could become slippery during hatching and this can make it difficult for the chicks to stand correctly. An unnecessarily slippery floor during hatching can lead to leg problems in chicks like splayed legs; therefore, I'll be cutting some galvanised mesh (5 x 5 mil squares) to size and retro-fitting this for the floor in future. This is the only modification I'll do though.
Durability – Unfortunately, after just on 2 years of use my JN8-48 failed due to the motor practically burning out. I concluded that I could have probably gotten more time out of my incubator if I had surrounded it with some type of insulation or even placed it into a box but it turns out the thin plastic case was susceptible to temperature changes and the motor simply worked too hard until it gave up.
Also, since uploading my video review on YouTube and starting a discussion on our forum, I've heard from many others who have had similar burn out problems, irregular temperature issues, fan breaking, and the unit breaking down in general. Therefore, I personally decided not to buy another JN8-48 but I did buy another cheap Chinese made unit model JN-448 by Nappole and you can see my review on my current incubator here.
Where to buy?
This particular model of incubator is sold independently online through various stores and I’ve found the price differs substantially. The best place to buy this type of incubator is on:
- eBay Australia – hands down, it’s the cheapest avenue;
- eBay USA – if your in America; or
- Amazon.
The model I purchased has since been superseded by a newer more improved model, which has a tilted back control panel for easier reading and a see through plastic lid making it easier to view the hatching. The newer model costs about $50 more then the older one and if I had to buy another one I probably would buy the newer model. Having said that, the old model can be got for an even better price now making it a real bargain incubator.
Conclusion
I certainly can understand people buying brand names and I do too; however, every so often a good “no name” product comes onto the market – this is one of those products. It's a clever incubator and it works as good or better than more expensive branded incubators.
Naturally, if you were semi-commercial or bordering on retail then this type of incubator is not really suitable. However, if you hatch out up to 200 birds a year (like me) then this will do the job well and for a lot cheaper than other models.
Here is a video review on the JN8-48 I put together on YouTube
If you'd like to talk about this incubator more or backyard incubation of poultry, join our forum at Self Sufficient Culture and post a question.
You can also leave a comment below.
Thanks for reading and thanks for your support.
Mark Valencia Editor SSM
Look, and see the Earth through her eyes…