Article updated on 24 May 2019 When I first saw rosella seedlings in the nursery I must admit to having little knowledge about the plant except for knowing great jam can be made from the “fruit.”
And, I further have to admit purchasing these seedlings without the slightest research into how to actually grow rosella except for reading the inadequate label on the punnet.
The reason I thought I knew a little about the rosella plant was because of hearing about the jam in general talk (mainly with family) and seeing the jam for sale at my school fate when I was a child.
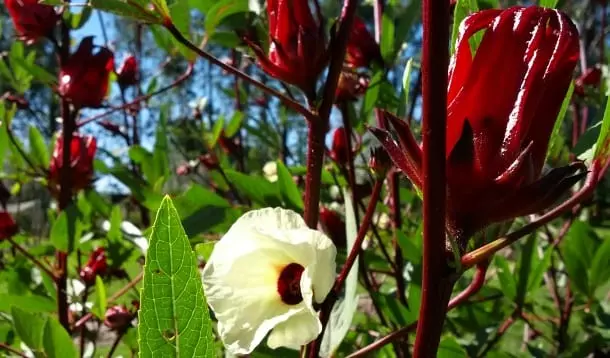
The rosella flower and red calyx (above image)
Somewhere along the line I heard the rosella plant was a native to Australia, which is wrong, but I always believed it was a native because of the way the plant (and jam) was portrayed in folk-law as a unique Aussie icon.
As it turns out, the rosella plant (plus the jam) originated in Africa and Asia. In fact, the rosella is loved the whole world over and every part of plant is edible so it’s little wonder once I started digging for information there was plenty to find.
The rosella plant
The rosella plant is a relative to the ornamental hibiscus, although the rosella flowers aren’t near as pretty as the commercial ornamental varieties found around many subtropical home gardens. Having said that, rosella flowers are still beautiful with its light pink rose like petals distracted by a striking red centre, so the plant does hold its own as an ornamental shrub for any garden albeit short lived.
 like petals distracted by a striking red centre, so the plant does hold its own as an ornamental shrub for any garden albeit short lived.
 The most common rosella variety grown in gardens, backyards, and farmed is a plant which grows as a bush up to 2 metres high and the same wide. The plant really does stand out in the garden with its rhubarb red stems and pretty pink flowers. After the flower a vibrant red calyx is formed growing to about the size of a shot glass – this is the “fruit” and the fleshy calyx is the main part of the plant used to make its prized jams, teas, and other products.
The stems, flowers, and calyx are surrounded by “bird’s feet” shaped large green leaves, which highlight the shiny red calyxes like a green backdrop. Because of these features, the rosella plant definitely is an eye catcher and this edible, large growing annual is sure to invoke lots of questions from visiting friends and family.
The calyx

Although the whole plant is edible, it’s the calyx which is primarily used to make jams and drinks like cordials or teas. If eaten on its own and picked straight from the plant the calyx has a taste similar to a slightly sour plum with a hint of a sugary after-taste. Overall, the “fruit” is unremarkable; however, once refined and made into something else (like jam) the taste and colour is uniquely delightful.
Inside the calyx seated at the base is a green, round seed pod holding about a dozen seeds. If the calyx is left to mature it will eventually deteriorate, turn brown, and shrivel around the seed pod with the pod itself drying out, opening, and spreading its seed. Therefore, it is important for cooking and drying (for tea leaves) that the calyx are taken from the plant when plump and young so they are in prime condition for use.
Growing the rosella plant
Rosella isn't the easiest plant to have in the garden but it's pretty easy to grow. What I mean is, the plant has a fair spread and can get 2 metres high all within 6 months so it does take quite a bit of garden space – fast. Nevertheless, the degree of difficulty in growing a rosella plant is right down the scale as it seems to be extremely hardy requiring little soil preparation or fertiliser. The plant can thrive in dry gardens too, requiring little water and suffering through dry spells easily if required.
Soil
Just the same, to get the best out of the rosella plant it should be grown in free draining, fertile soil and watered regularly. Extra dressings of fertiliser isn’t necessary in my opinion and may even hinder calyx growth by encouraging excess foliage growth. I prepare my rosella growing areas the same as my fruit trees by adding a small amount of animal manure and compost to the soil before planting.
Propagation

If growing rosella from seed, waiting for the weather to warm up to a consistent 24o C (around mid-spring in most places) will help with germination. Soaking the pyramid shaped seeds in some (initially) warm water overnight helps to bring on germination. Place the seed about 10mil deep into small punnets filled with a good seed raising mix and keep moist. The seedlings should emerge within 7-10 days.

Plant the seedlings out when they have a good root growth and are about 6 inches high. Ensure the newly planted seedlings are kept well watered for the first few weeks until they take hold and then a watering once a week is usually fine in moderate conditions.
Leave some calyxes on the plant at the end of the season to mature and dry out. Then collect the seed pods rub them open and keep the seeds in small plastic or paper bags for next season.
Growth
The rosella plant grows super-fast and will start flowering around 1 metre tall and then bloom sporadically until reaching head high or around 2 metres. During the initial flowering stages the calyx development may seem disappointing and the plant may even stagnate through the end of summer. However, don’t be fooled into thinking the plant has finished its season because in autumn the “second flowering” is generous and this final calyx development is the best time for collection.
At the end of its life (about mid-winter), the hollow wooded rosella easily fractures at the base of the plant and it’s common to see them fall over or large stems break away and die-off. Removing the spent plants is easy because as they die the hollow stems dry-out and become light and easy to handle or mulch up.
Harvesting the fruit/calyx
Although the first flowering may produce few calyxes, enough might be harvested for a small batch of jam or to make a tea but as mentioned the second flowering is typically abundant and one plant should produce enough calyxes for several good sized jars of jam.

I like to grow 3-4 plants at once and then I can be sure I will definitely have enough fruit for the season.
Most calyxes get to about 2-3 inches long and should be harvested when plump and young for best taste and before the calyx becomes too stringy. Calyxes can be collected and frozen in freezer bags over a period of weeks if there isn’t enough ripening at the same time and then defrosted and processed.
The fruit isn't difficult to harvest but some care should be taken when cutting the calyx from the bush so as not to get pricked by fine hair-like prickles around the stems so gloves should be worn when harvesting or pruning.
Processing the calyx requires the removal of the seed pod from the base. An easy way to remove the seed pod is to use an apple corer pressed and turned into the base of the calyx – the green seed pod should pop-out without any problem.
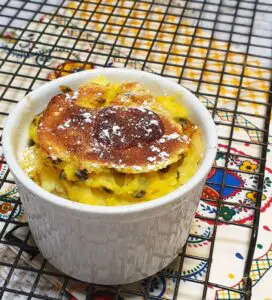
Rosella Jam Recipe

This rosella jam recipe uses the rosella calyx only without the addition of any other fruits like apples to boost the pulp or raise the pectin levels for better setting. I’ve found, using the rosella calyx on its own gives a rich, natural taste and by simmering the seed pods separately and extracting the pectin this way is more than adequate to make the jam set.
Ingredients
Making rosella jam is very similar to making most other sweet preserves and there’s really only 4 ingredients:
· Rosella calyx – a big bowl full (50-100);
· Water – just enough to simmer the fruit and seed pods;
· Sugar – equal amount of sugar to rosella pulp after simmering;
· Pectin – ½ x cup of home-made pectin from the rosella seed pods.
Method

Step 1 – Separate the seed pod from the calyx
Initially, the task of removing the seed pods from the calyx looks daunting but it’s actually quite easy. Firstly, give the calyxes a rince with water to remove any debris, dirt, or creatures. Then, using an apple corer, place it at the bottom of the calyx and with a twist push motion the corer should easily cut through and capture the seed pod pushing it out the other end.
Place all the seed pods in a medium sized sauce pan and the fleshy calyx in a large sauce pan.
Step 2 – Simmer the calyx and seed pods (in different pans)

Use only just enough water to cover both the calyx and seed pods and place on the stove top on high to bring to the boil then reduce down to a simmer.
The simmering of the calyx is to break them down into a runny pulp and this should take around 40-60 minutes.
The reason for simmering the seed pods is to extract the pectin from the seeds as this will be added later to the jam to help make it set. Simmer the seed pods until they break apart and turn into a cloudy syrup consistency – this should take about 40-60 minutes.
Step 3 – Strain

Strain the rosella calyx pulp through a medium strainer to catch any debris, which may not have broken down through simmering. Straining also helps to break the pulp into a finer consistency.
Strain the seed pods (which should be almost all broken apart exposing the seeds) through a medium or fine strainer and retain the strained liquid pectin.
Add ½ cup of the pectin to the rosella pulp.
Step 4 – Weigh and add sugar

Weigh the pulp and add the same amount of sugar then place it back into the pan and onto the stove.
Bring to the boil and then turn down to a simmer.
Step 5 – Setting point
Monitor the jam stirring occasionally to ensure it does not burn on the bottom. After about 40 minutes start checking to see if the jam has reached setting point by pouring a teaspoon of jam onto a cold saucer, which has been sitting in the freezer. Leave the jam on the saucer for 1 minute then lightly push from one side with your finger – if the jam crinkles and is gluggy then it is set so turn the heat off.
If the jam stays like a syrup then continue simmering and check again every 10 minutes until setting point is reached.
Step 6 – Bottle

Whilst the jam is still hot pour into sterilised jars, place the lids on, and set aside to cool.
Store in the pantry for up to 12 months (unopened) and refrigerate after opening.
Notes:
Scum: During the simmering process for the jam and pectin a scum usually forms on top. For a better end product, carefully scrap the scum from the surface every so often and discard.
Jam not setting: If you find the jam just isn’t setting no matter how long the jam simmers then try adding some more of the rosella pectin seed syrup. If the jam still doesn’t set, the setting point may have been missed but don’t despair as the rosella syrup can still be used as an ice-cream topping or a beautiful sauce for sweets or even savouries!
Making the pectin: In this article recipe, I recommend simmering the seed pods separately but you can skip the step of removing the seed pods and instead simmer the whole calyx (as I did in the included video) then strain out the seed pods before adding the sugar. This does save time, however, it also increases the chance of bits of seed left in the final product, which wouldn't be as nice.
Used by date: Jams and other similar preserves usually have a recommended use by date of 12 months; however, depending on storage conditions the shelf life may be reduced or significantly extended. Although not recommended, my mother in-law recently opened and consumed one of her home-made strawberry jams, which was over 5 years old and she said the jam was as good as the day she’d made it!
Personally, with sugar preserves, I tend to try and use them before 12 months but no matter how old a preserve is, upon opening I inspect the product to ensure there are no bacterial or fungal growth, putrid smell, or discolouring as occurred. If I find any signs of spoilage in my preserves, I discard the whole jar – when in doubt, chuck it out.
Wiki: For a comprehensive genus explanation of the rosella plant go to this explanation of the rosella plant in Wiki.
Other handy links
Preserving jars – eBay Australia
Lids to fit standard jars recycled from purchased preserves and pickles (this can be a much cheaper option) – eBay Australia
USA – Preserving jars eBay (USA) and Amazon
UK – Preserving Jars eBay (UK) and Amazon
Conclusion
I first grew rosella as a novelty because I like trying new food plants but I did have an expectation it would be a plant worth growing and it sure did live up to its reputation.
 The rosella plant is a useful and an eye-catching plant to grow in the backyard. The calyxes make an array of unique food stuffs and beverages with the jam, in my humble opinion, being one of the best damned jams a person could eat or make…
 This plant does need some space to grow; although, as an annual the growing season is short so perhaps it’s worth giving it a go knowing it won’t become a permanent member of the garden or vegetable patch anyway.
I’m certainly glad I gave the rosella plant a “go” in my garden and I intend to find a space for it every year from now on because this iconic jam made from plump red calyxes is now in demand by me, my family, and friends.
Here's the video on making rosella jam
Feel free to use the comment section below and have your say (no email is required). Also, visit and join our forum to discuss more about rosella, making the jam, and other topics.
Thanks for reading and thanks for your support.
Look, and see the Earth through her eyes
Mark Valencia – Editor SSM